Tilt and Shift on The Cheap
Contents
Part 1. A Quick Review of a Tilt/Shift Lens
Part 2. Doing it on the cheap.
Part 1. A Quick Review of a Tilt/Shift Lens
I have waited many years to acquire a Canon TS-E 24mm f/3.5L lens. This lens provides the unique capability, among name-brand lenses for small-format cameras, of both tilts and shifts in a strong wide angle lens. As my photography has tended even further to the digital domain, the ability to access at least some movements formerly reserved for large format has become more pressing. But the 24mm lens, while a strong wide angle with the 24x36 format, is barely even a wide-angle lens in the 15x23 format of the Canon 10D. So the purchase of this lens necessarily followed my acquisition of a Canon 5D with a full-frame sensor.
But this is a quick review, and not so much a review of the performance of the lens. Whether the lens is particularly sharp or not (it is) doesn't really matter. Because getting the capabilities the lens offers comes no other way.
This review is divided into three parts, covering the three main applications of tilts and shifts. None of these applications can be simulated using digital processes without imposing (at the least) a loss of quality.
1. Perspective Correction
This is the easy one, and it is easy to explain. If the camera's image plane is parallel to the subject plane, the subject will not appear to recede into the distance. This is usually applied vertically to keep buildings from converging towards the top. But when you position the camera such that the image plane is vertical, the subject my rise above the field of view. There are three choices at this point: Use a wider angle lens and crop away the unneeded bits, transform the image digitally, or shift the lens so to adjust the field of view. My article on the Hartblei 45mm PCS lens for medium format covers this function. But here are a couple of examples:
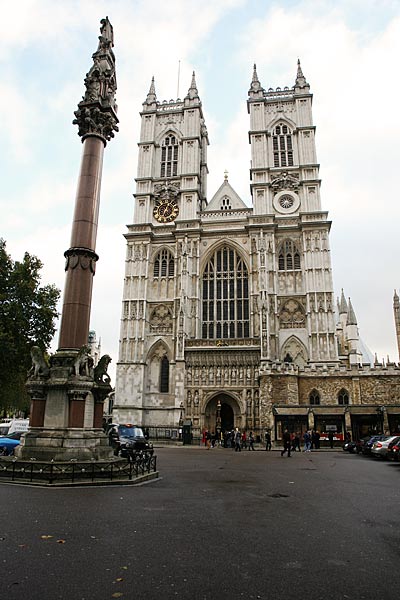
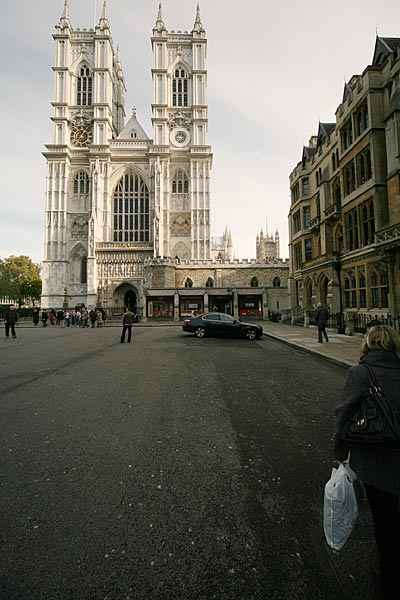
Two Views of Westminster Abbey, London, 2008. Left: Canon 5D, 24-105/4L at 24. Right: 5D, Sigma 12-24 at 13mm.
In the left view, the vertical lines converge. In the right view, made a few days later (and with a different lens in my bag), I used an extreme wide-angle lens to provide the necessary field of view when the camera is held (nearly) vertical. Vertical perspective is more controlled, but the composition leaves much to be desired, and the needed cropping will quickly throw away quite a lot of pixels. These approaches require us to either use the convergence or make some other compromise.
The following images were made using the 24mm T/S lens, with the lens shifted to raise the field of view to allow the image plane to be held vertical.

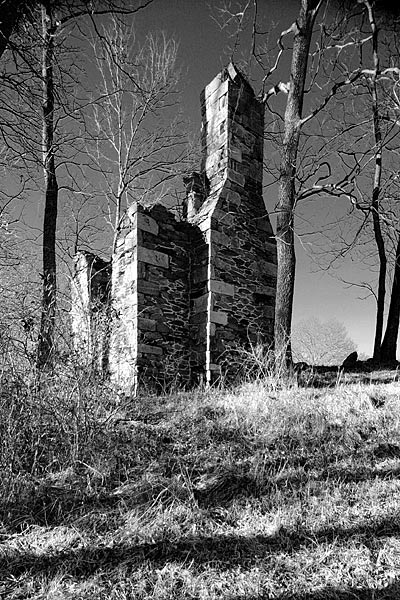
Mill and House Ruins, Loudoun County, Virginia, 2008. Canon 5D, 24/3.5L T/S, shifted vertically, hand-held.
2. Panoramas
Software that stitches images together into a panorama can undermine the pixel resolution of the image through its calculations. But a shift lens can produce very high resolution panoramas without the need for software. The image below was made from two images, quickly stitched together using the Photomerge automation in Photoshop. That tool is not powerful, but having the images be properly aligned without a couple of pixels really helped. The images were hand-held, and it would have been much easier had the camera been mounted on a tripod, with only the lens being shifted. Again, it works by changing the field of view without changing the perspective, since the image plane is not moved.

World War II Memorial and Washington Memorial, Washington, DC, 2008. Canon 5D, TS-E 24/3.5L, two images at extreme right and left shift.
The image below shows how the images were aligned, and the stitch line is very clean even though the images were made without a tripod.
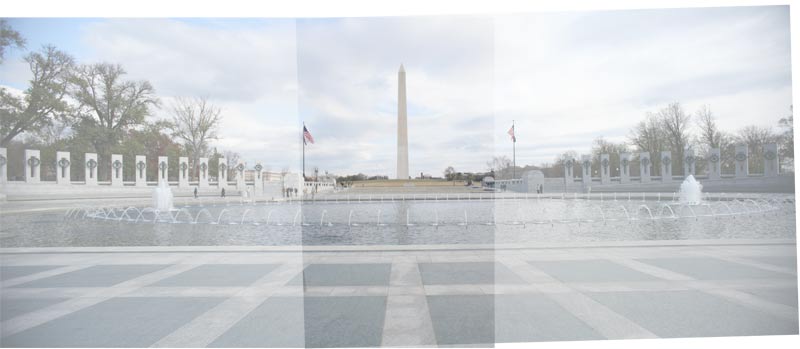
This image also shows the limits of the shift capability of the lens. The aperture was f/10, and the vignetting is caused by the shift moving the lens too far and the circle of illumination of the lens encroaching on the image area. The lens was shifted its full amount. The vignetting didn't help the sharpness in those corners, either. But the resulting image is 7000 pixels wide.
3. Adjusting the Focus Plane
Now, let's get to the important stuff. One can apply a perspective correction in software, and one can stitch images together in software to make panoramas. But it's hard to make things focused in software when they were not focused in the camera. So, anything that allows adjustment of the focus plane can do things software can't do.
The Scheimpflug Rule states that the image plane, the lens plane, and the focus plane all intersect. Thus, by tilting the lens plane, the focus plane can be adjusted. With a short lens like the 24, it doesn't take much. For example, the lens was tilted about five degree to make the image below.
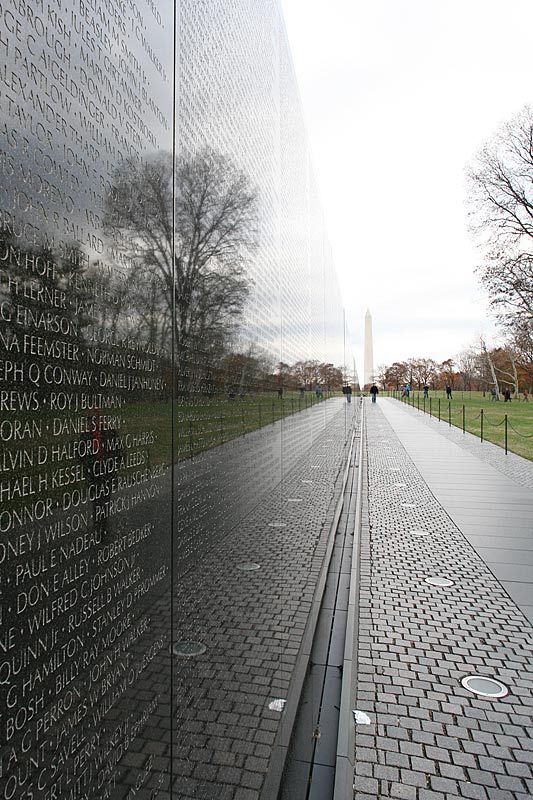
Vietnam Memorial and Washington Memorial, Washington, DC, 2008. Canon 5D, TS-E 24/3.5L, tilted towards the wall.
The objective here was to make the plane of sharp focus coincident with the wall of the memorial. The Vietnam Memorial has proved to be quite powerful in its simplicity, slicing through the Washington Mall like a scar. But that stark simplicity reveals important detail when viewed up close: The names of all the American service people killed in that war are carved into its surface. The monument is therefore best viewed from a few inches. Seeing that detail in the context of the mall is a photographic challenge (tackled with greater success by better photographers than me, but that is also true of most of my subjects, alas). The lens is tilted to the left by enough to pull the left side of the focus plane right up beside the camera. The focus plane runs along the surface of the wall and through the distant monument. When viewed up close, though, the joints in the bricks along the right edge of the frame are less sharp than where the bricks approach the wall.
This effect is not the same as increasing the depth of field. Without the tilt, there is no aperture small enough to get sufficient depth of field for this image, and even if there was, it would come with quality-robbing diffraction. This image was not possible without the tilting lens.
The lens can also be tilted so that the focus plane intersects the subject plane rather than running along it. That has the effect of increasing the degree to which foreground and background material is out of focus. For portraiture, this technique can be used to increase selective focus, which has been made harder to get with smaller formats. For landscapes, the focus plane is shifted in unrealistic ways that trick the viewer into thinking the image is a miniature. Both of these techniques are currently popular. In the two images below, the lens was tilted to move the focus plane along the wall of the old church, and then tilted the other way to intersect it. The camera position is (mostly) the same, and the aperture is f/8 in the top image, and f/5.7 in the lower image. F/8 is not nearly enough to render the whole wall in focus, and f/5.7 is not nearly wide enough to achieve the extreme (for a strong wide angle lens, anyway) selective focus. Each approach has its own artistic possibilities.
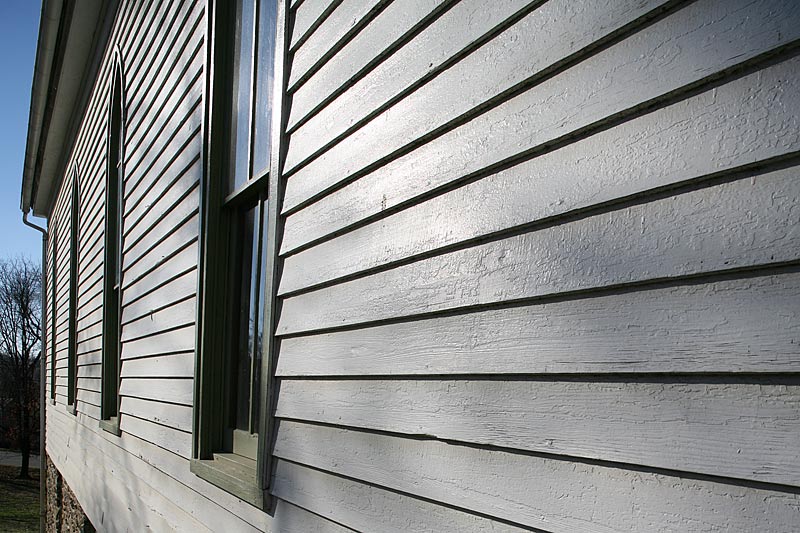
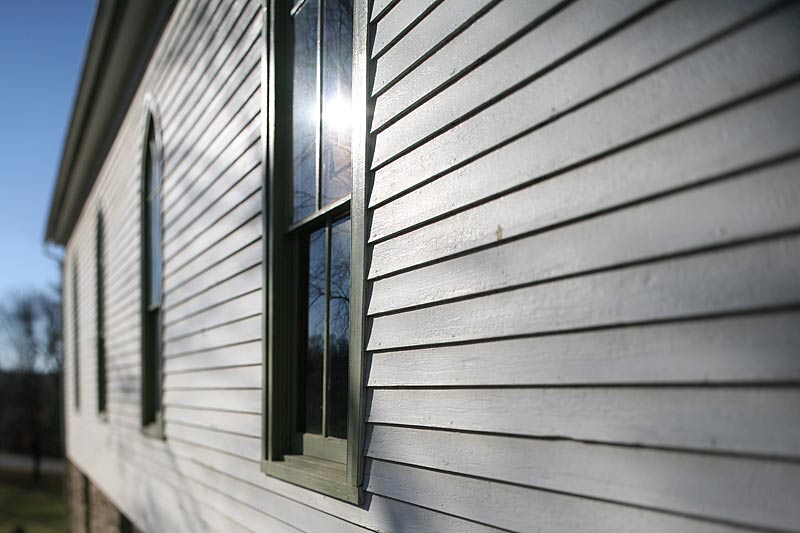
Old Church, Waterford, Virginia, 2008. Canon 5D, TS-E 24/3.5L. Top: Tilted into the wall. Bottom: Tilted away from the wall.
Any tilt/shift lens on a small-format camera is a compromise. With a view camera, photographers can tilt on multiple axes to optimize the focus plane over the whole image. But that flexibility comes at a huge price of inconvenience, with the result that many potentially worthy images never get made. But even if the capability only approximates what a view camera photographer might enjoy, it provides what can't be provided any other way.
So, a tilt/shift lens isn't just for architectural photography. And it isn't just for achieving extreme selective focus. Photographers who use digital cameras and have the need to adjust the focus plane simply have no other choice. Thus, it doesn't matter that the lens is a bit cumbersome, that it suffers from slight barrel distortion, or that we (horrors!) have to focus it manually. I wish I had bought it 20 years ago.
Part 2. Doing it on the cheap.
As of early 2009, Canon announce two new lenses in their lineup. They include an new version of the 24mm lens discussed above, the TS-E 24mm/3.5L II. And, astoundingly, they have added a 17mm tilt and shift lens to the lineup, which I will not wait 20 years to buy. The old 24 is no longer available, which isn't a problem except for the fact that the old one was $1100 and the new one is priced at $2200. (The 17 is $2500.)
But there are ways to take advantage of these capabilities without spending that kind of scratch, as long as you can work with longer focal lengths. After all, Canon still sells 45 and 90mm TS-E lenses, and these provide the same capabilities at longer focal lengths and at prices over a grand for each. In Part 2, we will explore the use of Pentacon Six medium format lenses adapted to Canon using a tilting adapter, and the combination of that adapter with the Hartblei PCS shift-only lens.
A tilting adapter is a no-brainer for a medium-format lens. The lenses are designed 1.) for a large mirror box, and 2.) for a larger format, so they provide both room for the adapter and abundant coverage. The illuminated circle of a typical lens for the 6x6 format is a little over 80mm. The diameter of the 24x36 format is 43mm. The chances of tilting or shifting the lens out of the image circle are just nil.
But there is another potential problem, and that's the small mirror box in the camera. The mirror box of the small camera can cast a shadow on the sensor if the lens is shifted too far. The optical axis of the lens must be kept within the mirror box to avoid that problem. Since the narrow dimension of the mirror box on a full-frame camera is 24mm, shifting is limited to 12mm. The good news is that this is a lot of shift, equivalent to 50mm on a 4x5 camera.

Fence, Loudoun County, Virginia, 2009. Canon 5D, Carl Zeiss Jena Biometar 80mm/2.8 in Pentacon Six mount, on tilting adapter, tilted 8 degrees to the left.
In the image above, tilting the lens made it possible to tilt the focal plane to run along the fence. The aperture was f/5.6, which provided narrow depth of field as a means of selectively focusing on the fence to isolate it from the background, especially near the camera where the wire might have been lost against too much background detail. It also provided a way to get the whole fence in focus--it's unlikely that any available aperture would have provided sufficient depth of field without the tilt.
Sometimes, it's useful to have both tilt and shift at the same time, though I'm finding this not to be as important as it might seem on first glance. But it is possible to do so by combining the tilting adapter with a shift lens.
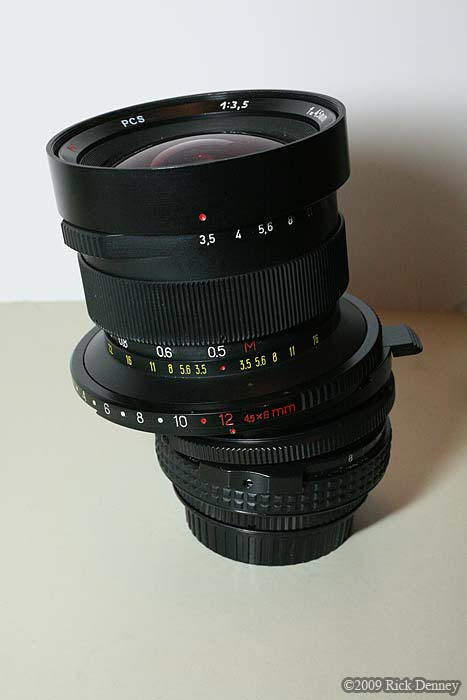
Hartblei 45mm PCS shift lens on tilting adapter. (Image made with Canon 50/2.5 Compact Macro.)
The image above shows a shift lens mounted on a tilting adapter. This arrangement exceeds the capability of the TS-E 45mm lens offered by Canon for over $1000, because the tilting feature and the shifting feature each have their own independent rotation. The tab at the right is the release for the rotation of the shift capability, and the thumb-rest near the bottom is where one grabs the tilting adapter to rotate it. The diamond-knurled rubber ring at the bottom is the control ring for tilting, and the control ring for shifting is the large-diameter ring that reads 12 mm in the picture. The lens is shown at full tilt and full shift.
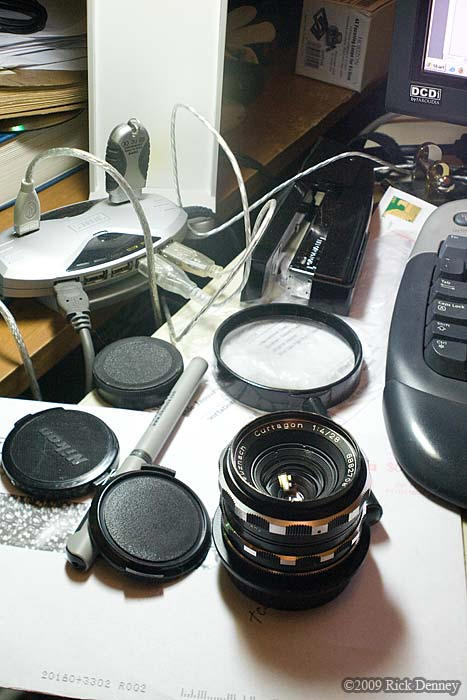
Desk Mess, 2009. Harblei 45mm PCS on tilting adapter, tilted 8 degrees and shifted 12mm.
The picture above is certainly not art. But it does show the capabilities of this particular combination. Close inspection of the full image reveals that the plane of sharp focus is nearly horizontal even though the camera is surprisingly close to vertical. The straight sides of the lamp base and the barrel of the foreground lens show the benefits of shifting the lens to make the image sensor more vertical. The nearly horizontal focus plane shows the benefit of the tilt. The focus plane includes the retainer ring and reflections on the front element of the foreground lens, the lettering on the thumb drive plugged into the USB hub, and the label in the background on the lower left corner of the monitor. Even the box in the deep background is close to sharply focused at the top, and not at the bottom. The foreground lens is about a foot from the taking lens, which without the tilt will not focus more closely than about 1-1/2 feet.
But is the medium format lens sharp enough to use on a small-format camera? Here are some 100% crops from the above pictures, so that you can be the judge:
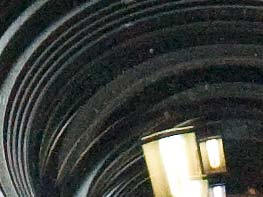

These images are shown at 100%, and would represent what you would see on a 30x45" print. Both look good enough for me. If I need better, it's time to haul out the view camera and go to a larger format.
The total price for my tilting and shifting combination was about $600. But the price for the 80mm tilting combination was less than $200, and both lenses share the same tilting adapter. The Hartblei 45mm PCS was based on the Arsat Mir-26 45mm/3.5 lens, which is still available as new-old-stock. The Hartblei shift version is no longer available--Hartblei has moved on to building tilt and shift mounts for high-end Zeiss Oberkochen glass--and the shift-only version was never made in large quantities. (The lens above is Number 55 of that series.) But Arsenal in the Ukraine also made the Arsat 55mm/4.5 PCS lens, which is reportedly excellent, with better optics than the 45, and which as of this writing is still available for a very good price.
So, it's possible to gain the benefits of tilts and shift without spending a fortune on Canon's specialized optics, as long as one doesn't need the ultra-wide-angle view. And this approach allows one to explore the capability over a range of excellent and inexpensive lenses. But I'm still saving up for that TS-E 17mm lens.